
IRB Printers
The IRB provides affordable printing to students and employees via CUPS (Common Unix Printing System).
Students are given access to all public printers, employees to every printer.
The IRB Printing system is run in cooperation with the Fachschaft Mathematik Informatik, who handle the money deposits while we handle the technical systems. This Fachschaft can open a printing account for you, from which money is debited when your print on our systems.
Printing requires a positive balance. To view current balance and past print jobs, visit druckerseiten.de
Pricing
| Print Type | Cost per page |
|---|---|
| black, draft | 2 cents1 |
| black | 4 cents |
| color, simplex | 20 cents2 |
1. No quality guarantees are made for draft printers (*-draft). Use a different printer if quality is of importance.
2. All pages printed as color pages cost this much, regardless of the amount of color actually present.
Printing with Linux
To be able to send a printing job to our CUPS server, your local CUPS client needs to
- support Kerberos Authentification
- have our CUPS server configured
- the local user login has to be identical to your IMT login
First of all, you must ensure that you have a valid Kerberos ticket. How to set up Kerberos is described here.
If this is done, enter the following in your /etc/cups/client.conf:
Encryption Required
SSLOptions MinTLS1.2 DenyCBC
TrustOnFirstUse No
ValidateCerts Yes
ServerName cups.cs.uni-paderborn.de:443
This file is usually empty. You can create the file if it does not yet exist.
Staff members may replace the ServerName line by
ServerName cupsmit.cs.uni-paderborn.de:443
Afterwards, restart your local CUPS clients. You should be able to print now.
Arch Linux problems
The default cups package on Arch Linux does not support Kerberos because this was deprecated by cups and is not included by default.
As an alternative the AUR package cups-gssapi can be used or the cups package can be compiled with the option --enable-gssapi.
$ lpr -P <printer name> -o <options> <document>
Options
Additional options have to be appended with -o. There has to be an -o for every option. Options may vary for different printers. Some examples:
- Set margin: -o page-left=NN (left can be exchanged with right, top, bottom. "NN" is a placeholder for points (1 point = 0.35cm))
- Automatic line break: -o wrap=true
- Explicit use of a specific paper slot: -o InputSlot=Lower (it is in fact a little more complicated, because every printer comes with its own names for different slots)
Example: Printing a text file with around 1cm left margin and automatic line break
lpr -P compinet -o page-left=70 -o wrap=true datei.txt
It becomes cumbersome quite fast to use these options. If a lot of settings are to be made, it is advised to use a graphical lpr substitution like kprinter (see below).
Duplex-Printing
Duplex-printing is done by special printer instances. Every printer "<printername>" comes with a second entry "<printername>-dup" which can be used to print duplex.
It is not required to set duplex printing in the options manually.
Creating instances
It can be useful sometimes, to create an instance for frequently used options. It is possible to create such instances using lpoptions. They are saved at ~/.lpoptions.
- Show options: lpoptions -p <printername> --- Lists all possible options of a printer in its default settings.
- Setting resolution (DPI): lpoptions -o ColorModel -o Resolution=600dpi -P <printername>
- Set instance: lpoptions -p printername/instancename -o Option1 -o Option2 ... -o OptionN --- Setting your own instance (old instances will be overwritten!!!).
- Show instance: lpoptions -p printername/instancename
- Delete instance: lpoptions -p printername/instancename -x
Deleting jobs
Jobs can be cancelled using the Linux command line.
Printing with Windows
- To add a new CUPS printer, open the Start Menu and in the search field enter "cupsad.cs.upb.de" (on older Windows System, you first need to select "Run")
- You need to establish a VPN connection before you can access \\cupsad.cs.uni-paderborn.de. Use your IMT username and password if you are asked for credentials; make sure that you prefix your username with "ad\". Now double-click the desired printer.
- If you receive a message that no driver has been found in the network, dismiss the Dialog with "OK" and select a proper driver manually.
- You find the type of the printer at https://cupsad.cs.upb.de/printers/ First select the vendor on the left (normally Kyocera or HP) and then the model on the right. If the model is not in the list, try a "similar" printer (eg. "Kyocera FS-3900DN" instead of Kyocera FS-3830N)
- Confirm with "OK". The printer should now be ready for use.
Printing with Mac OS
Treiber installieren
Bevor Sie einen Drucker installieren können müssen Sie auf Ihrem Mac den passenden Treiber herunterladen und installieren.
Für Kyocera finden Sie diese unter https://www.kyoceradocumentsolutions.de/de/support/downloads.html
Drucker hinzufügen
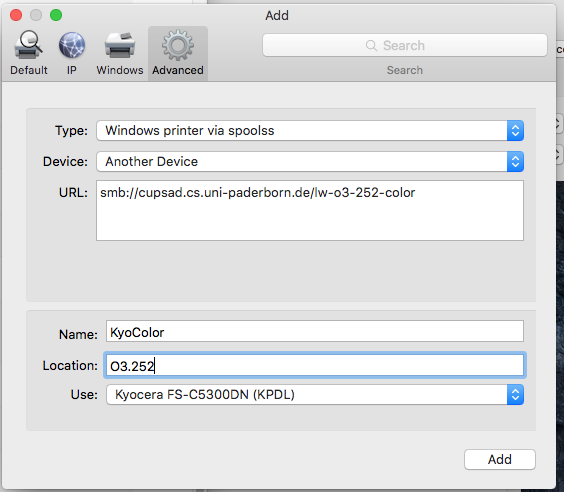
Den Drucker fügen Sie in den Systemeinstellungen über die Rubrik "Drucker & Scanner" hinzu. Klicken Sie auf das +-Symbol unterhalb der Druckerliste, wählen Sie den "Erweitert"-Button (Advanced) fügen Sie den Drucker analog zu den Einstellungen im Screenshot hinzu.
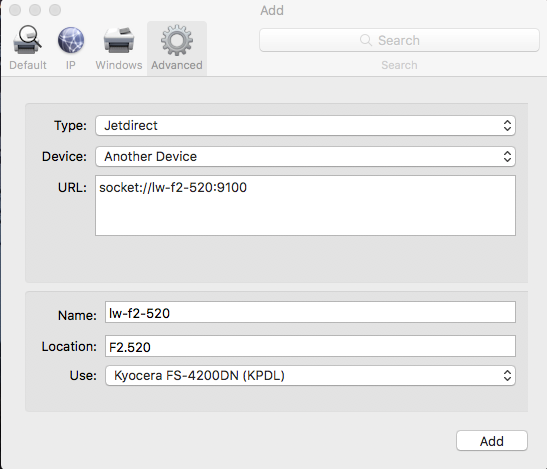
Aktuell funktioniert das Drucken am besten über das "HP Jetdirect - Socket" Protokoll. Dazu dieses einfach unter "Protokoll" auswählen und dann in der Adress-Zeile den ausgesuchten Druckernamen eingeben und mit ":9100" ergänzen. Also z.B. ¨lw-f2-520-color:9100¨. Wenn alles richtig eingetragen ist und eine Verbindung zustande kommt wird automatisch der Druckername und der verwendete Treiber ausgewählt. Jetzt nur noch mit einem Klick auf "Hinzufügen" bestätigen.


CUPS access is managed via IMT Active Directory. You must connect at least once via the Explorer to allow authenticated printing:
- Explorer: -> Go to ->Connect to Server
- smb://cupsad.cs.uni-paderborn.de/
- Connect
- Enter username formatted as ad\<your login>
- Save the passoword to the Keyring.
Proper printer drivers are required to print from Mac. Drivers for our Kyocera printers can be found here: https://www.kyoceradocumentsolutions.de/de/support/downloads.html
Add the printer in question to the category "Printers & Scanners" in your system settings. Cick the "+-" symbol below the Printer listing and choose the "Advanced" tab. Use the settings seen in the screenshot below.
If the "Advanced" tab is missing, you need to ctrl+click on the toolbar that shows the other options and select "customize toolbar'. This then opens a menu where you can drag the advanced tab onto the toolbar.
Screenshot Cups:
cs.uni-paderborn.de/fileadmin/informatik/irb/Mac_OSX_Kerberos_Configs/mac_add_printer.png
Screenshot IP:
cs.uni-paderborn.de/fileadmin/informatik/irb/Mac_OSX_Kerberos_Configs/mac_add_printer_ip.png
Mit macOS 10.14 führen Drucker auf manchen Kyocera-Druckermodellen, wie z.B. dem Kyocera P3055DN dazu, dass nur Zeichensalat bzw. PS-Sourcen gedruckt werden. Aktuell ist uns hier kein aktueller Druckertreiber von Kyocera bekannt, es kann aber unter Verwendung des Allgemeinen PCL-Drucker-Treibers (Generic PCL-Printer) gedruckt werden. Dazu muss der alte Drucker gelöscht und ein neuer Drucker hinzugefügt werden, wie im nächsten Abschnitt zu den Problemen mit macOS 10.13 beschrieben wird.
Seit dem OS Update auf macOS 10.13.2 gibt es Probleme zwischen Apple Geräten und allen gängigen KYOCERA Druckern.
Das Fehlerbild ist vielfältig und tritt unregelmäßig auf. Bei KYOCERA ist diese Problematik schon bekannt und es werden Treiber Updates zu Verfügung gestellt.
Zu finden sind diese unter:
www.kyoceradocumentsolutions.de/index/serviceworld/downloadcenter.html
einfach den aktuellen Treiber installieren und alles sollte wieder wie gewohnt funktionieren.
Achtung!
Bei einigen Geräten muss der gewünschte Drucker einmal entfernt und neu hinzugefügt werden.
Drucker entfernen
Den Drucker löschen Sie in den Systemeinstellungen über die Rubrik "Drucker & Scanner". Wählen Sie den zu löschenden Drucker aus und klicken Sie auf das "-"-Symbol unterhalb der Druckerliste.
Drucker hinzufügen
Den Drucker fügen Sie in den Systemeinstellungen über die Rubrik "Drucker & Scanner" hinzu. Klicken Sie auf das +-Symbol unterhalb der Druckerliste, wählen Sie den "Erweitert"-Button (Advanced) fügen Sie den Drucker analog zu den Einstellungen im folgenden Screenshot hinzu.
Sollte der Button nicht in der Symbolleiste vorhanden sein, können Sie diesen Buttons hinzufügen, indem Sie per ctrl + Mausklick neben die anderen Symbole klicken, "Symbolleiste anpassen wählen" und den fehlenden Button in die Leiste ziehen.
Screenshot Cups:
cs.uni-paderborn.de/fileadmin/informatik/irb/Mac_OSX_Kerberos_Configs/mac_add_printer.png
Screenshot IP:
cs.uni-paderborn.de/fileadmin/informatik/irb/Mac_OSX_Kerberos_Configs/mac_add_printer_ip.png
$ lpr -P <printer name> -o <options> <document>
Options
Additional options have to be appended with -o. There has to be an -o for every option. Options may vary for different printers. Some examples:
- Set margin: -o page-left=NN (left can be exchanged with right, top, bottom. "NN" is a placeholder for points (1 point = 0.35cm))
- Automatic line break: -o wrap=true
- Explicit use of a specific paper slot: -o InputSlot=Lower (it is in fact a little more complicated, because every printer comes with its own names for different slots)
Example: Printing a text file with around 1cm left margin and automatic line break
lpr -P compinet -o page-left=70 -o wrap=true datei.txt
It becomes cumbersome quite fast to use these options. If a lot of settings are to be made, it is advised to use a graphical lpr substitution like kprinter (see below).
Duplex-Printing
Duplex-printing is done by special printer instances. Every printer "<printername>" comes with a second entry "<printername>-dup" which can be used to print duplex.
It is not required to set duplex printing in the options manually.
Creating instances
It can be useful sometimes, to create an instance for frequently used options. It is possible to create such instances using lpoptions. They are saved at ~/.lpoptions.
- Show options: lpoptions -p <printername> --- Lists all possible options of a printer in its default settings.
- Setting resolution (DPI): lpoptions -o ColorModel -o Resolution=600dpi -P <printername>
- Set instance: lpoptions -p printername/instancename -o Option1 -o Option2 ... -o OptionN --- Setting your own instance (old instances will be overwritten!!!).
- Show instance: lpoptions -p printername/instancename
- Delete instance: lpoptions -p printername/instancename -x
Deleting jobs
Jobs can be cancelled using the Linux command line.
Special Print Jobs
There are two scanner available for use. This service is provided free of charge.
- E1.129 Flatbed Scanner
- F2 copier & BW-scanner
A flatbed scanner is avaliable for use in the guru office at the main campus during our office hours.
The copier on F2 can scan your documents and send them to an EMail address. Choose the menu item "Senden" on the printer panel for further options.
Our plotter is a HP Designjet Z9dr 44" that is able to be installed on computers at the F building that are on an LAN connection.
If you need any help or want us to print a poster just write our support e-mail.
Install on Windows as a printer: use TCP/IP device
Adress: lw-f2-520-plotter.cs.uni-paderborn.de
Driver: HP Designjet Z9dr 44in V4
Enable the vertical trimmer in the print dialog to automatically cut the paper on all sides.
- When making test prints in smaller sizes, use a color inkjet rather than the fa[12] color laser. Experience shows that the resulting colors are closest to the DIN A0 plotter.
- University Paderborn Corporate Design is available here.
- A paper cutter is provided near the plotter. Please handle it gently during use.
- PDF can provide an acceptable intermediate format. See the PDF guides further up the page for help.
List of Printers & Jobs
- cups.cs.uni-paderborn.de/printers
- \\cupsad.cs.uni-paderborn.de